There will be most likely more posts to come in the future on this subject...
Noise reduction is always a trade-off between preservation of details and removal of luminance and color artifacts. You should not expect noise reduction tools to do miracles: they will not create details that are lost due to noise, and if you ask them to remove noise completely they will also remove a lot of important details... Hence, fine-tuning and personal taste are the keys.
My personal goal is to transform the initial digital noise into a more "grainy" and "good looking" (maybe even "artistic") noise, such that it does not disturb the eye.
For this tutorial I will use a
If you would like to play with the settings of my custom noise reduction, you can get the corresponding preset from here. The preset can be applied to any image, with the only limitation that the input image should be in RGB colorspace.
As usual, this tutorial requires a very recent version of PhotoFlow. You can either download and compile the sources from GitHub or get the updated windows installer from here.
The result of the recipy described in this post is shown below (mouse over to see the final result), and the rest of the post will describe how I got there...

Choice of demosaicing method
The first important choice comes even before applying noise reduction methods, and involves the demosaicing of the RAW image. PhotoFlow provides two different demosaicing methods:- Amaze, which is designed to maximize the level of details that is extracted from the Bayer pattern; it works very well on low-noise images, but we will see how it can introduce artifacts in noisy ones.
- IGV, which produces softer results than Amaze which are however very "clean" when noise is present.
Below you can see a comparison between the two methods (mouse over to see the Amaze result). I have disabled on purpose the false color suppression inside the RAW developer module, as I want to address the noise reduction problem entirely with G'MIC.

Iain's Noise Reduction
G'MIC provides a powerful noise reduction filter (called "Iain's Noise Reduction"), now included in the set of filters imported into PhotoFlow, which I will use as a term for comparison for my own experimentation.
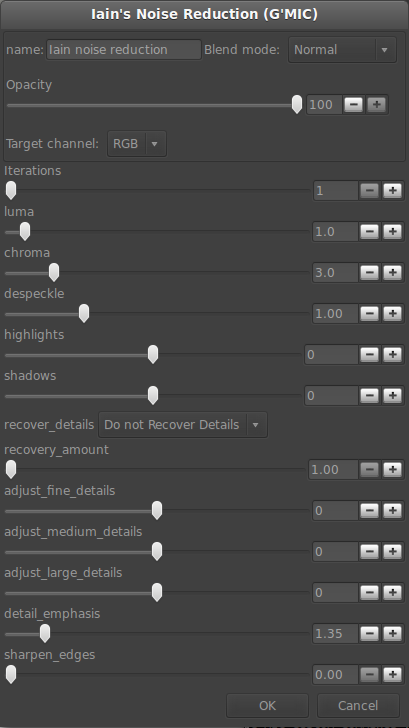
Let's then see what Iain's noise reduction filter is able to do on this image. The filter parameters that I've used are shown in the screenshot on the right. I've left the chroma NR to the default value of 3, and reduced the luma NR to 1 to avoid loosing too much high-frequency details. I've also disabled the details recovery step, as it makes the filter VERY slow.
The result of applying those settings to the IGV image is shown below (mouse over to see original).

Custom noise reduction
Having Iain's reference in mind, I've tried to see if I was able to get something different (and maybe better) using other noise reduction filters form G'MIC.
As a starting point, I'll use Iain filter for chroma NR (setting the luma NR slider to 0) and use two additional filters for luma NR:
- Garagecoder's "Despeckle" filter for salt&pepper noise reduction
- "Guided blur" filter for additional luma NR
This time I'll not go through all the steps of the procedure, assuming that you already know how to add layers and layer groups in PhotoFlow (if not, I suggest you to have a look at some of the past tutorials), and I'll concentrate on the results of the intermediate steps. As mentioned at the beginning of the post, you can get the corresponding preset from here to see how layers are configured and grouped.
First of all, let's see how the "despeckle" filter works. Below you can see the result of applying this filter with "tolerance=20" and "max_area=10". I've found that lower tolerance values or larger max_area values tend to introduce artifacts in in small-scale details. Mouse over to see the result of the chroma NR only.

Next, I've applied the "guided blur" filter on top of "despeckle", with "radius=5" and "smoothness=100". Larger values of the radius tend to increase the noise near high-contrast edges, while lower values tend to increase the overall noise. The "smoothness" parameter can be pushed up to obtain a smoother picture that still preserves good detail.
The images below show the final results (mouse over to see image after despeckle) for the IGV (top) and Amaze (bottom) demosaicing. One can clearly see that Amaze introduces more artifacts that are difficult to remove by the NR.


Finally, I show for reference the result one gets with the IGV image when setting "smoothness=200" in the guided blur filter (mouse over to see "smoothness=100" version).

As one can see, fine details are still quite well preserved. Moreover, one can reduce a bit the opacity of the "guided blur" filter in order to restore a bit of noise texture, so that the image looks more "natural".
I hope you will find this first introduction to noise reduction with G'MIC useful. And if you find mistakes or have suggestions to improve the results, just leave a comment and I'll be more than happy to update the post with new material!
Not sure if you got my previous comment.I'm on windows and Photoflow is a bit flakey for me unfortunately. But I've added a new noise reduction filter to my testing folder for the GIMP G'MIC plugin which will be better for Photoflow. It's called MS_Patch_NR and should work with any number of channels. Make sure you get the function 'linear_x3' as well.
ReplyDeleteVery interesting! I'll test your MS_Patch_NR filter asap, and eventually update the blog post.
ReplyDeleteConcerning your windows version, is it just too slow or really not working properly? The devlopment is done under linux, the windows version is cross-compiled and I'm still working on improving the overall performances...
I checked to make sure my filter had made it through the update and it's name has lost it's formatting. Look for 'Ms patch nr' .
DeleteI was only curious about Photoflow so I tried it for a short time and then it crashed and that was about all I did. Can't really tell you more than that sorry.
In case you are able to reproduce the crash and you have some time to report about that in the issue tracker on github, that would help me a lot.
DeleteThanks for looking!